Showing posts with label Tips. Show all posts

A Complete Sharing Widget With jQuery Effect

How To Add Attractive Sharing Widget To Blogger:-

Before proceeding to the tutorial, you should add the basic widget code to your blog from this tutorial.

How To Add Special Effect To Sharing Widget:-


If you want to add animated effect in your share widget then following change should be done in your blog template. Find the following code in blogger template.
</head>
Paste the following code just above it to make your sharing widget animated.
<script src="http://ajax.googleapis.com/ajax/libs/jquery/1.6.2/jquery.min.js" type="text/javascript"></script>
<!-- internetricks4u.blogspot.in-->
<script type="text/javascript">
$(document).ready(function(){

$("#myshare tr td").hover(function(){

$(this).find("img").animate({left:10},50);

$(this).find("img").animate({left:-10},50);

$(this).find("img").animate({left:0},50);

});

});
</script>
<!-- internetricks4u.blogspot.in-->
To add opacity effect to sharing widget then add following code just above the </head>.
<script src="http://ajax.googleapis.com/ajax/libs/jquery/1.6.2/jquery.min.js" type="text/javascript"></script>
<!-- internetricks4u.blogspot.in-->
<script type="text/javascript">
$(document).ready(function() {
$('#myshare tr td img').each(function() {
$(this).hover(function() {
$(this).stop().animate({ opacity: 0.3 }, 350);
},
function() {
$(this).stop().animate({ opacity: 1.0 }, 350);
});
});
});

</script>
<!-- internetricks4u.blogspot.in-->

Change Opacity Of An Element Using jQuery

jquery effect opacity change
jQuery is a great library of JavaScript function. You can easily create special effects in page with the help of jQuery. Most common jQuery effects are drop down menus, drag and drop elements and animations. Professional Web Designers effectively uses jQuery to change the opacity of various HTML elements like image tag <img> and ordered list or unordered list <ol> or <li> etc. All standard browsers supports jQuery which makes it more important for web developers. In Blogger, you can increase the appearance of your article and make your Blog template to look more professional with the help of jQuery by adding special effect in the post. So lets see how it works ?

Change Opacity Of An Element Using jQuery:-

The complete jQuery code given below is an example to change the opacity of an image from any desired value to any desired value with animation, which will execute on mouse hovering.

Change Opacity Of An Image Using jQuery:-

/* Code Written on http://internetricks4u.blogspot.com/ */

<script src="http://ajax.googleapis.com/ajax/libs/jquery/1.6.2/jquery.min.js" type="text/javascript"></script>

<script type="text/javascript">
$(document).ready(function() {
$('img').each(function() {
$(this).hover(function() {
$(this).stop().animate({ opacity: 0.3 }, 500);
},
function() {
$(this).stop().animate({ opacity: 1.0 }, 500);
});
});
});
</script>
/* Code Written on http://internetricks4u.blogspot.com/ */

Explanation:-

This simple jQuery script changes opacity of images from 0.3 (Mouse hover state) to 1.0 ( Normal state) with animation. Corresponding HTML code is given below.
<div>     
<img src="URL Of Image 1" />
<img src="URL of Image 2" />
</div>

Suppose if you want to focus a particular image that comes under specific CSS id or class then the corresponding jQuery and HTML code is as follows

HTML Code

<div>

<div id="testingcss">

<img src="Image url"/>

<div id="workingcss">
<img src="Image Url 1"/>
<img src="Image Url 2"/>
</div>

</div>

</div>

jQuery Code

For hovering a image that comes under the CSS id workingcss, without affecting the image that comes under testingcss id, the following changes should be done in above jQuery code.
.
/* Code Written on http://internetricks4u.blogspot.com/ */

<script src="http://ajax.googleapis.com/ajax/libs/jquery/1.6.2/jquery.min.js" type="text/javascript"></script>

<script type="text/javascript">
$(document).ready(function() {
$("#workingcss img").hover function(){
$(this).hover(function() {
$(this).stop().animate({ opacity: 0.3 }, 500);
},
function() {
$(this).stop().animate({ opacity: 1.0 }, 500);
});
});
});
</script>
/* Code Written on http://internetricks4u.blogspot.com/ */

Only the code in pink color should be change in order to focus particular image.

All In One Subscription Widget For Blogger Blog


Add Subscription Widget To Blog

How To Add All In One Subscription Widget To Blogger Blog:-

  1. In Blogger Dashboard, Go to Design / Page Element.
  2. Choose "Add a gadget" and then select "HTML / JavaScript".
  3. Paste the following code inside it.
blogger design pageelement
    /* Code on http://internetricks4u.blogspot.com  */
    <style type="text/css">
    #abtbox
    {width:320px;
    height:100%;
    }
    #smallabtbox
    {width:320;
    height:74px;
    border-bottom:1px solid #EEE;
    margin:5px 5px 0px 5px;
    margin-left:auto;
    margin-right:auto;
    }
    #smallabtbox1
    {width:320;
    height:74px;
    /* border:1px solid black;*/
    margin:0px 5px 5px 5px;

    }
    #smallabtbox1 span
    {color: #F55;
    font-size:15px;
    margin-bottom:30px;
    padding:7px;
    font-weight:800;
    font-family:"Palatino Linotype", "Book Antiqua", Palatino, serif;
    }
    #abtbox #smallabtbox input.mailverify
    {background:#fff !important;float:left;border:1px solid #d2d2d2;padding:0px 8px 0px 8px;color:#a19999;font-size:12px;height:25px;width:185px;/*border-radius*/-webkit-border-radius:5px;-moz-border-radius:5px;border-radius:5px;}

    #abtbox #smallabtbox input.joinemailupdates
    { border:1px solid #7575FF;
    border-radius:5px;
    -moz-border-radius:5px;
    background-color:#7575FF;
    color:#FFFFFF;
    font-weight:900;
    margin-left:10px;
    height:26px
    }
    </style>


    <div id="abtbox">
    <span style="margin-left:20px;color:#F90; font-weight:900;font-size:17px;margin-left:25px;position:relative;top:15px;"> Get Free Tricks Daily </span>

    <div id="smallabtbox">
    <div style=" position:relative; top:30px; left:25px;">
    <form action="http://feedburner.google.com/fb/a/mailverify" method="post" onsubmit="window.open('http://feedburner.google.com/fb/a/mailverify?uri=allbloggingtricks', 'popupwindow', 'scrollbars=yes,width=550,height=520');return true" target="popupwindow">
    <input class="mailverify" gtbfieldid="10" name="email" onblur="if (this.value == '') {this.value = 'enter your email here...';}" onfocus="if (this.value == 'enter your email here...') {this.value = '';}" type="text" placeholder="Enter your email here..." />

    <input name="uri" type="hidden" value="AllBloggingTricks" />

    <input class="joinemailupdates" type="submit" value="Submit" /></form>

    </div>

    </div>
    <div id="smallabtbox1"><span><center>
    Follow us on-</center></span>
    <div >
    <a href="http://twitter.com/allbloggingtric"> <img src="https://blogger.googleusercontent.com/img/b/R29vZ2xl/AVvXsEhDJ9aIFA1lsMwt8dEg06ocFWEcwq8v2186Drbvms8T-ZXKRNs_KlJtGitwC8MnWbOXc6kZZWRBkWW9vyoaqHAQkLtNv2-uNVHiGCRpQpDRCxr6Qg14ph7EQ9PEeR_F5HN7dzGnpQnoHPs/s1600/1.PNG" height="20" width="80" style="margin:0px 0px 0px 10px;"/></a>
    <a href="http://facebook.com/bloggingtrick"> <img src="https://blogger.googleusercontent.com/img/b/R29vZ2xl/AVvXsEgD_gFUkeAotqdExIT9JvTJKoB8rEodQwHRUAFezkl8EyHcRdimYG8wVGQp-NJdXuyUDX3onK8jf0YfWgg8bmDDn1BAw5vUFh21fkI2RzLwRftSQq-bJOGhHQKM0epgS01Pi3V5AhqIcoc/s1600/facebook_logo.PNG" height="20" width="80" style="margin-left:14px;"/> </a>
    <a href="https://plus.google.com/117305698834844817404"> <img src="https://blogger.googleusercontent.com/img/b/R29vZ2xl/AVvXsEgmchDovsP7HybvR7VbszDxmRnxIB8QuQJf2R2H_aVTJqN2ZukPAxHw4_1B3Mpnj7ZNMHkNQ3B1ZJtDy-kTYh9A74S3pgoSNLbyckEFsneQ0fndK34Y0Gn1vn1pYFHpL4SxDClqEnrvLo4/s1600/google_plus_logo.PNG" height="22" width="90" style="position:relative; top:5px; margin-left:20px; "/></a>

    </div>

    </div>
    </div>

    Note:-Make Following Changes

    • Replace allbloggingtric with your twitter page.
    • Replace bloggingtricks with Facebook fan page URL.
    • Replace 117305698834844817404 with your Google Plus profile.
    • Replace allbloggingtricks with your feedburner usename.
    • Further Note that this widget will work best if your widgets of sidebar are designed to have 320px width.
    I give my best in producing this widget or in writing this tutorial. Instead if anyone find difficulty in any part of this tutorial then they can contact me directly by drooping comment below.

      Tips To Write A Killing Blog Post

      Killing blog Post

      How To Write A Killing Blog Post:-

      Work With Images:-

      Don't forget to include images in post body as it describes most of your content. Some people may find difficulty in reading text on the blog but if you include targeted images to your content they get a comprehensive idea regarding your Blog post.
      One point should also be kept in mind that the default name of images like Images00123.png, Photo23.jpeg should be change with suitable keyword and use of alt tag may be good practice to impress the Search Engines. The complete article to change the image name or to include alt tag can be read from here.

      Proper Use Of Important HTML Tags:-

      Important HTML tags
      Make a habit to repeatedly use of important HTML tags as these tags impress Search Engines and increase your blog ranking. A complete list of tags are gives below.
      /* Code By http://internetricks4u.blogspot.in */

      <Abbr> Tag
      <abbr title="World Health Organization">WHO</abbr>

      <Acronym> Tag
      <acronym title="World Health Organization">WHO</acronym>

      <B> Tag

      <b>This is Blogging World</b>

      <Em> Tag
      <em>Emphasized text</em>

      <I> Tag
      <i>This is italic text</i>

      <U> Tag
      <u>A Underline text</u>

      <h1> tag should be used once in a content with less than 70 character or less than 10 words. Don't use <h4>, <h5>,<h6> tag in content.
      If your blog is related to programming then use of <pre> tag may be the good option for you. You can choose large number of syntax highlighter from here.

      Don't Forget Outbound linking:-

      It is a very good strategy to drive traffic on the blog if you link your content to some another related content at appropriate position of your blog. And it also effect your page ranking in search engine.

      Settings For "Custom Robots Tags" Inside Post Editor

      custom robots tags in bloggerBlogger just added Custom robots header tags to post editor. One of the features of search preferences was robots.txt and Robots tags which could be set only for homepage, archives, posts and pages. But now you can edit these settings even for individual posts and pages right from BlogSpot post editor. Unlike Meta Description, Custom Robots Header tags are not visible and are not shown if you try to check  it by viewing the browser source file for your blog. You will only see Meta Description if you have added the dynamic code. We will learn today where are robots tags added in your templates and how can you view them. Lets first find and locate these Robots header tags.

      Read more »

      How To Find and Redirect Broken Links In Blogger?

      redirect broken links in bloggerI personally really liked the Page Redirect option among thelatest search preferences by blogger. It lets you easily redirect or cloak  deleted, missing, non-existing or removed posts in your BlogSpot blogs to an existing location. Normally for pages that are not found, blogger automatically displays the 404 Error page but this can harm your PageRank from internal and external links. Suppose you had a post and people started giving it backlinks and it got circulated everywhere, if for some reasons you decided to delete that post, people and robots will see a URL error i.e Page Not Founderror. All that PageRank juice which was pointing this specific page will be lost therefore you must learn how to redirect missing pages in blogger both for redirecting PageRank juice and also for making your blog more search engine friendly because this is the only way to reduce the number of crawl errors you see at your Google Webmaster Account. We will be dealing this tutorial in a detailed manner to make best possible use of Custom Redirection.

      What are Broken Links?

      In layman terms any page or post that you delete in your blog or website is termed as a broken link by search robots. Its called broken because the link points to a missing content and displays a 404 error page.

      How To Find Broken Links?

      Sometimes you don't remember which posts were deleted by you or which URLs are causing crawl errors and making it difficult for search spiders to index your blog more smoothly. To find broken links in your blog no matter you are running a Google blog or Wordpress or any website, the method below applies to all:
      1. Go To Google Webmasters Account
      2. Select your blog
      3. Click the link under crawl errors
      blogger crawl errors
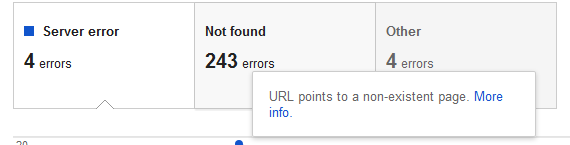
           4.   Next click on Not Found
      image
      If you are running a blogger blog then you will observe several missing/broken URLs list , this is because most of your dynamic pages like comment page and search pages needs to be removed from search indexing using your webmaster account and if you see too many errorsthen do not panic, it wont effect your blog SEO too much but removing errors is always good than letting the error list grow. I will discuss the techy part of it in some other tutorial for this post we will keep our focus on deleted posts links only.
      Now carefully look at the URL errors and note down the post links that you come across. In my case I had deleted a post I once wrote on Feedburner and also one on HostGator Plansthat I deleted due to some reasons. The links would look like this in the error list:
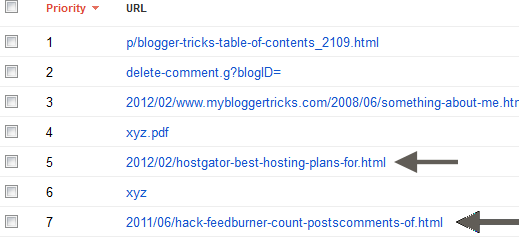
      blogger url errors
      Since people were linking back these two posts therefore I had to redirect them to homepage so that I keep receiving the PageRank juice and keep Blog indexing by robots smooth. Anyone who would click this links would see a 404 error page instead. So what we did was redirecting both these pages to Blog homepage. The procedure is defined in next step.

      Redirect Broken Links

      It is always wise to redirect broken links to homepage or any related page. This will flow the backlinks generous juice instead to homepage  or any page that is related to that deleted post. Lets see how we redirected the two links above.
       Redirect to a Related Post:   Redirecting the Hostgator Link
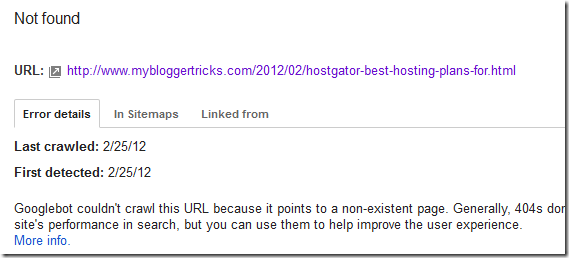
      Clicking the hostgator link which is at Priority#5 as shown in the screenshot above opens a new window from where you can copy its full URL
      page not found
      This is the link:
      http://www.mybloggertricks.com/2012/02/hostgator-best-hosting-plans-for.html
      The part of link we are interested is the highlighted ending portion.
      Now lets learn how to redirect the above broken link to an existing post (related link) which also speaks about HostGator hosting plans and the link for it is:
      http://www.mybloggertricks.com/2012/01/hostgator-best-hosting-plans-for.html
      Don't get confused that the above two links seem exactly similar except the month 01 and 02. Its just a coincidence :)
      Lets now redirect the link:
      1. Go To draft.Blogger.com or just blogger.com if you have upgraded to new interface
      2. Then go to Settings > Search preferences
      3. Click the edit link next to custom redirects
      4. Inside the FROM box I would insert the broken link
      5. and Inside the TO Box I will insert the link for an existing link to which we want to redirect the missing/broken link
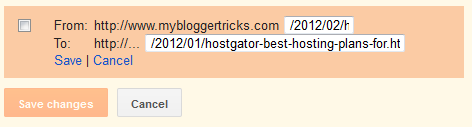
      redirect broken links blogger
           6.   Click the Save link followed by the Save Changes button
           7.   The link in now successfully redirected to an existing post.
      If you click the broken link below, it will take you straight to the new related post.
      Redirect To HomePage:  Redirect the Feedburner link
      Since I had no related post for feedburner so I redirected it to my homepage and this is what I recommend to you all. Redirect to related posts only if you have any else simply redirect all broken links to homepage.
      The procedure is same except for the TO box. I need to redirect the feedburner link from this:
      http://www.mybloggertricks.com/2011/06/hack-feedburner-count-postscomments-of.html
      To homepage link
      http://www.mybloggertricks.com/
      See the screen shot:

      redirect posts in blogger
      Notice that inside the FROM box I inserted the ending portion for broken link and inside the TO box I simply inserted a forward slash i.e. (/)
      Click save and all done!
      Now click the following link and you will find yourself redirected to MBT Main Homepage.

      Need Help?

      I just hope this demonstrative tutorial may prove helpful and locating and redirecting missing links in your blog. The method will redirect all links in your blog no matter how many times they are interlinked thus not saving both PageRank and traffic from external links that point to you. Without the above method you will have to manually locate and edit the links which could take months!
      It is a new addition in our services apart from 302 redirect services for blogger to wordpress migration that we already offer. I juts hope you find it easy to implement the above method correctly. I use it for the SEO of this blog and our other blogs. Please let me know if you needed any help. Wish you peace and love! :)

      Source: mybloggertricks

      CSS button generator

      There are many old timey Button generator out there but with new css you can make some awesome buttons. To save your time you can use generators. One of the best and easy to use button generator can create awesome css buttons like the image below.

      The css will be already generated for you to copy paste. You can very use these codes in your website or blogs very easily. An example of the code is shown below

      <style type="text/css">
      .Buttontext {
          -moz-box-shadow:inset 0px -11px 0px -1px #caefab;
          -webkit-box-shadow:inset 0px -11px 0px -1px #caefab;
          box-shadow:inset 0px -11px 0px -1px #caefab;
          background-color:#77d42a;
          -moz-border-radius:12px;
          -webkit-border-radius:12px;
          border-radius:12px;
          display:inline-block;
          color:#306108;
          font-family:arial;
          font-size:28px;
          font-weight:bold;
          padding:16px 24px;
          text-decoration:none;
          text-shadow:-1px 2px 0px #aade7c;
      }.Buttontext:hover {
          background-color:#5cb811;
      }.Buttontext:active {
          position:relative;
          top:1px;
      }

      </style>
      <a href="#" class="Buttontext">Get this</a>

      If your still confused about how to use your generated button, You can check out step by step tutorial here.


      And now to give you the magic link:

      http://www.cssbuttongenerator.com/

      The Link Within

      Blog sites will do well to harness the advantages of internal linking as they seek to build a reliable network outside of their sites.  Internal linking may provide benefits similar to those offered by external linking such as helping to improve search engine rankings for the site’s posts and pages.  However, what it primarily does is to increase page views by encouraging readers to click on links within the site, thereby effectively increasing the total amount of time a reader spends on the site itself.

      Internal linking suggests cohesiveness of articles and posts offered by a site.  By suggesting related readings that can be found within, sites are able to present themselves as a more reliable source of comprehensive information.  Many sites are already using plug-ins that create  a sitemap page that provides links to posts required by readers.  Links to related posts can also be conveniently placed at the end of posts.

      The number of internal links can be increased by posting articles in a series. Since one post is directly related to the others in a series, internal linking makes sense.  This option however should be used prudently to avoid creating the impression that articles are purposely being broken down to gain page views.  Bloggers can also opt to provide periodic summaries of their posts which conveniently contains links to the most popular posts on the site.  This is to allow inclusion of internal links while affording readers the chance to be made aware of missed articles.

      Text links provide a chance to link to older posts.  Bloggers who consistently spurn out quality content will find this internal linking option quite convenient to do.  Internal linking should be done in a manner that encourages readers to spend more time on the site instead of appearing like a strategy to get more of the readers’ time.

      Thngs to remember when choosing a blogger templete

      In the crowd of thousands of free blogger template you should always choose the "right" template for your blog. If you are a serious blogger or have a good mission for your blog you should definitely take this seriously. Even though they shouldn't, they will judge you by the looks of the blog right after the article. You can find lots of different customized paid and free blogger template over the internet. And here are some good tips you should remember when getting a template for your blog or customizing it.


      1. Choose your type


      The first thing is to match with the work your doing. If you  have a blog about dead people and mystery it will not be great choice if you use a super colorful template. Think about your blog as a reader and the environment they need for to enjoy the article you write. 


      2. Number of columns


      This can be define as one of #1 's sub category. Where you should know about your blog. Don't get any ads ready blog if you are new blogger or don't have much experience with html. Think about what your visitor will do and how fast and easily they can do it. Think about this and get a template.


      3. Know your rights


      Although you can find billions of free template you should know how much free is it. Most of them allow you to use it with link back others might give it for free or not allow for certain use. To avoid future problems read and see the rights of you to use the template. 


      4. Color Counts


      If you don't have enough knowledge about html editing you should choose your color that matches your requirement and content. 


      5. Size and neatness


      Choose your size of the blog where the actual content will appear. Using too many types of "cool stuff" might not be goof for your visitor and the speed of your blog. If the blog is too laggy people won't be interested in going to see anything extra you offer.


      6. Your reader's have diabetics


      Adding plugins, wages, script are good to make your blog "cooler" but you should remember that your readers have diabetics if you give them too much sugar they will most likely die! Keep it balanced.

      Remember if you are expecting visitor it's not you who will need the information, your reader will. So do whatever it takes to give them the simplest interface and user-friendly fast blog.


      I wrote this post originally on my other blog pretty long ago, I think it still worth some value.

      Using Free Image

      There are many needs of digital images online. It is And there are billions of images out there you can just copy paste and use it to your blog. For bloggers it is very important to have a good image with each post and most of them Google search it and use it to their blog. It might be a great high quality image but most likely your now hosting a copyrighted material. If you want to hide from all the penalties you also Google search for free images which gives you few billion result of site that will provide you "free" images, which aren't actually as free as you think it is.

      Google is the world


      What Google search does is to view all the indexed images over internet and there are no way to know if it is actually copyrighted or not. If claim the copyright for a copyrighted image, either the copyrighter or your host can take down your site. If you think you are lucky, you will already be penalize on traffic by your search engine.


      How about royalty free?


      Royalty free is a system where there is a copyright holder and they allow you to use their images with out royalty fee. With of course limitation. It can mean you have to pay the creator one time fee, or creator will limit you to certain size, length and where and how you can use the image. So don't go crazy with royalty free stuff. There is a copyright holder who can take action against you for going over limitation.


      The free photo sites then?


      Definitely not. Every free image distribution sites has certain limit. Some makes you link to their site (takes your juice), some wants a limited time royalty. Some are just scam and list of images from Google. Some sites says their photos are public domain (see below for more info), while they get the images from user upload where anyone can upload a copyrighted photo isn't a good place to find your photo either. Of course there are actual free images that you can use for your site out there, but since most of them are not actually what you need don't take the chance.


      Public Domain?


      Yes you are allowed to use public domain image freely in your site or blog. Public domain images are images that doesn't have any copyright holders. It's in a position that it is unable to restore the copyright claim for the photo. Thus you can use the image for almost anything without royalties or permissions. But you can not claim copyright for the image. Unfortunately not every site that says to have public domain photos are public domain, so be careful using one. Public domain is the best choice if you are looking for free images.


      So where can I find public domain images?


      There are lots of public domain image search out there. Here you can find a Wikipedia's big list of sites for your need.

      How To Make Money From Blogging

      There are lots of reasons why you may have written a blog. You enjoy writing. You want to share your views. You want to promote your business. Or maybe you want to make money. Yes, you really can make money from writing a blog. Increasingly people are realising blog writing can in fact be quite a profitable venture, whether it enables you to give up your part-time job, help you finance your studies, or provide extra income to fuel an active social life. You can even earn a full time income from blogging, but remember there is no such thing as “get rich quick” but by following these simple steps you’re be monetizing your blog in no time. And even if your goal of blog writing is not making money, it’s a nice perk.

      There are three main ways you can make money from blogging: Advertising, affiliate marketing, and selling products/ services. There are many different ways of how you can make money from blogging within these three categories. Which ones are the best? Well the truth is there is no single way to get rich from blogging. First you need to establish your niche. The techniques you chose will depend on your niche, as well as on your own skills and preferences. But as always not all techniques are equal and there are some highly effective methods that are worth knowing. So here I am going to reveal some excellent ways to make money from your blog. And soon enough you will be pulling in the cash from your blogs.

      1. Google Adsense – This lets you chose a number of ads that are within your blogs niche. You will be paid according to the number of people clicking on the ads. Their normal ads are excellent. 250×300 pixel ads are the most effective. Ads that are placed above the fold or blended with content generally get higher click-through-rates.  www.google.com/adsense
      2. CPM Advertising Networks are also worth a look. Here you get paid for the number of page views that your ads on your blog generate. To get a higher CPM: Put your ad at the top of the page, and use a bigger format in terms of number of pixels. Check outhttp://tribalfusion.com/, http://www.cpxinteractive.com/ and http://www.burstmedia.co.uk/.
      3. Affiliate programs – By helping others to sell their products through an affiliate program, you can earn some money too. How? Your blog provides information or mentions another’s product. Your readers click on the advert from your blog to obtain further information. A great way of generating more income from this method is write a review so your readers can get to know more about the product.  You need to be honest and highlight the pros and cons of the product.  If they proceed to purchase, you earn as well. To find an affiliate program, you can go to companies directly or try http://www.clickbank.com/index.html.
      4. Amazon associates – The Christmas period, especially, is a brilliant time for the Amazon associates program. https://affiliate-program.amazon.co.uk/
      5. Ebook sales – Write and sell your own ebook. You could also use your blog to sell hardcover books.  http://www.lulu.com is a great website if you’re interested in self publishing.
      6. Develop premium content or a membership program – Earn frequent income from those subscribing to your services. Create a membership site where you can earn regular income from your members. Develop free content that has lots of value to your users. Once they are impressed by your basic offer, you can entice them with access to premium content and exclusive material for a small fee. Membership programs are a fantastic way to have a recurring income as unlike purchasing a one off product, generally membership sites have monthly recurring fees which means more money for you!
      7. Direct banner advertising – Selling your own advertising space is an excellent money-making method. But in order to get qualified advertisers ensure you have a large audience.
      8. Review products -  If you get a lot of traffic to your blog there are many companies that would happily pay you to write a review of their product which in turn drives traffic back to their website.  Not to mention reviews add credibility to a product.  Look out for new products launching and approach them with your offer.  Better still create a page offering this service. If you’re just getting started http://www.postsgenius.com/  is a useful website.
      9. Create job boards – To create a profitable job board you need a blog on a specific niche and a reasonable amount of traffic.
      10. In-text advertising – Sponsored links will be placed in your text content of your blog. A user may roll their mouse over the link. If the user clicks, you will make some money. Check out http://www.kontera.com  and http://www.vibrantmedia.com/.
      11. Speaking – If you’re an expert in your niche why not share your knowledge and experience.  From only doing a couple of events, you can generate a very nice addition to your income from speaking plus it raises your credibility and promotes you in the offline world.
      12. Host live webinars – This is a great way to not only build your list but also you can charge people for attendance or up-sell them your products/services at the end.  The key is to provide a huge amount of value and offer the opportunity for questions at the end.  I usehttp://www.gotomeeting.com/fec/webinar to host mine.
      13. Promote your services. Your blog will build your profile and show your experience in your niche.
      14. Ask for donations – If you don’t ask, you don’t get! Try adding a PayPal button and ask for a beer or a coffee.  Alternatively you could donate the money to a charity instead. Check out these great WordPress plugins to help you http://wordpress.org/extend/plugins/donation-widget/, http://wordpress.org/extend/plugins/donate-everywhere/.