Do you know what is Yahoo! messenger? I sure you is surely knew it. Yahoo! messenger is one of yahoo.com service very popular in the world. Then what his relation with blog? some blogger wish to be in his blog attached yahoo ! messenger icon , hence if him online in yahoo! messenger can in knowing by his blog visitor and also can easy to in contacting for chatting. If you ask to me, can yahoo! messenger icon add at blog? the answer is can, and not only that, we can choose icon what is will add. The choice is differentiated in 10 choice, you remain to choose style ID which which is compatible according to your :
This is the style ID of yahoo! messenger icon :
Now, how to place the code to your blog. Follow the steps :
1. Login to blogger with your ID.
2. After entering the dasboard page, click Layout.
3. Click at Page Element tab.

4. Click at Add a Page element.
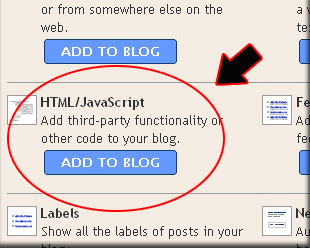
5. After emerging pop up window, click add to blog button for the things HTML/JavaScript.

6. Copy and paste the code below into available column :
7. Change some attributes on the code above after you copied it onto your blog:
- Change 'YOURID' to be your Yahoo ID.
- Change '0' to set the size of border, up to '10', and '0' means disabled.
- Change '2' to the number shown below to change the badge that will appear on your blog like the badge example below this. If you would like to use the badge number 6, you need to change '2' to '6', so it'll be t=6
8. Click
9. Finish. Please see the result.
This is the style ID of yahoo! messenger icon :
| t=0 | t=9 |
 |  |
| t=1 | t=10 |
 |  |
| t=2 | t=11 |
 |  |
| t=3 | t=12 |
 |  |
| t=4 | t=13 |
 |  |
| t=5 | t=14 |
 |  |
| t=6 | t=15 |
 |  |
| t=7 | t=16 |
 |  |
| t=8 | |
 |
Now, how to place the code to your blog. Follow the steps :
1. Login to blogger with your ID.
2. After entering the dasboard page, click Layout.
3. Click at Page Element tab.

4. Click at Add a Page element.
5. After emerging pop up window, click add to blog button for the things HTML/JavaScript.

6. Copy and paste the code below into available column :
<a href="http://messenger.yahoo.com/edit/send/?.target=YOURID"><img src="http://opi.yahoo.com/yahooonline/u=YOURID/m=g/t=2/l=us/opi.jpg" alt="Status YM" border="0" /></a>
7. Change some attributes on the code above after you copied it onto your blog:
- Change 'YOURID' to be your Yahoo ID.
- Change '0' to set the size of border, up to '10', and '0' means disabled.
- Change '2' to the number shown below to change the badge that will appear on your blog like the badge example below this. If you would like to use the badge number 6, you need to change '2' to '6', so it'll be t=6
8. Click

9. Finish. Please see the result.


